Always up to date
Sign up for our newletter

You can measure the dog and person separately. The dog and harness user do NOT have to be together!
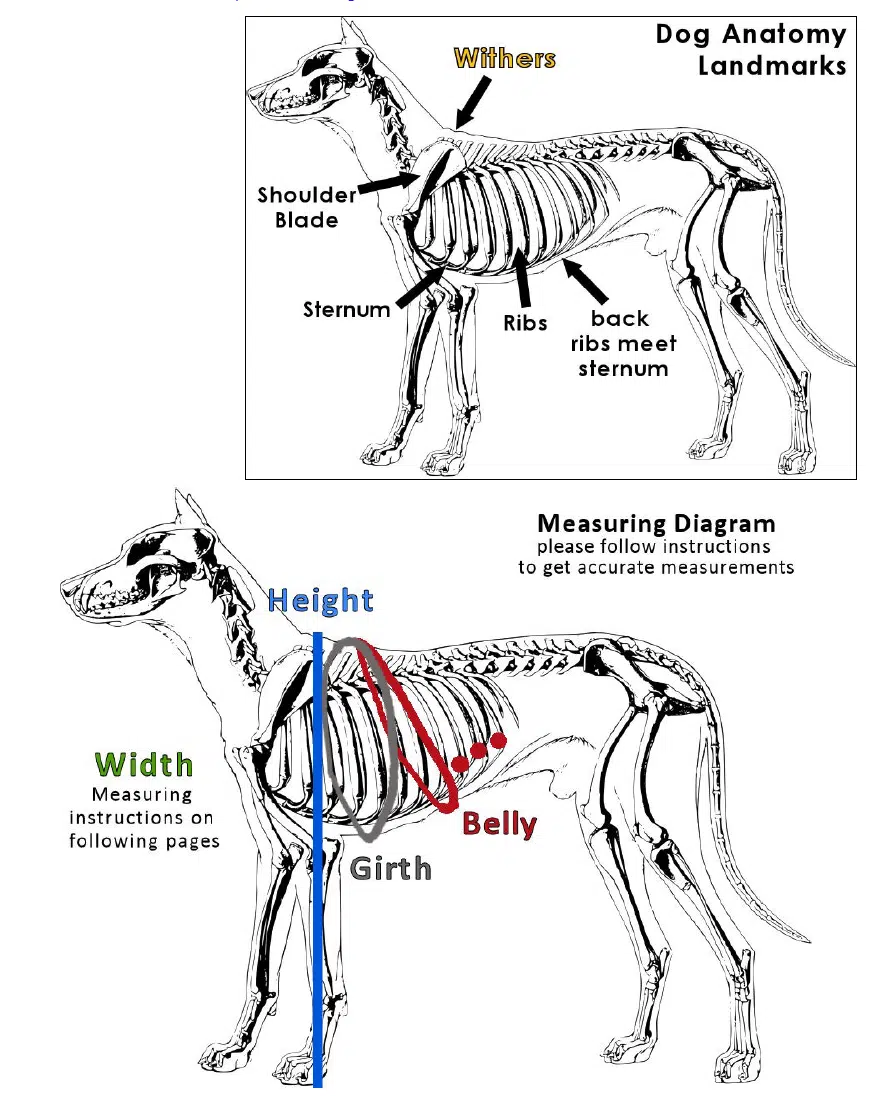
• This measurement should be a straight, vertical line from the top of the shoulders to the ground. If using a flexible measuring tape, do not bend the tape over the dog.
• Additionally, as shown in the video, you can ask your dog to stand next to a wall and mark his height on the paper taped to the wall. As seen in the video, a hardback book is a helpful tool; place the edge of the book on the wall and slide it down until it touches the dog’s withers. Mark the paper UNDER the book. Then measure from the mark to the ground.


• This measurement goes around your dog’s ribs, behind the front legs, at the deepest part of his chest. Start the measuring at the “sweet spot” behind the withers, go down under the deepest part of the dog’s chest and back around to the top.
• The measuring tape should be mostly vertical, forming a complete circle around the dog’s chest. Measure snugly but don’t squish your dog. (With long haired dogs, be sure you’re measuring the dog’s body, not just their floof!)
• This measurement starts in the SAME PLACE at the sweet spot, just like you did for the girth. This time, the tape will go further back under the ribs.
• First, locate the spot under your dog’s belly where his/her ribs come together and join the sternum (indicated in red on the diagram). Feel the dog’s side and find the back of his ribcage, then count 3-4 ribs forward. Follow this rib down and palpate to find the notch where the deep part of his chest curves up toward the belly (flanks).
• Bring the measuring tape under this point of the dog’s ribs, and
pull the tape up and forward to the “sweet spot.” The measuring tape must be snug. The measure will be at a diagonal angle.
• Pro Tip: put the measuring tape under your dog and “see-saw” it back and forth while pulling forward toward the withers—this settles the tape nicely under the belly, and then bring both sides of the tape to the “sweet spot.”
• Avoid measuring vertically around the dog’s waist, or place the measuring tape so far back it reaches the dog’s flanks—both will yield inaccurate measurements. Usually, the belly and girth measurement are within 3 inches of each other. Remember, we will let you know if anything doesn’t look right!

• There are two ways to measure the dog’s width. Both are best
with a regular flat ruler.
• This is an important measurement; the handle(s) will be made based on how wide your dog is, so take this measurement multiple times for accuracy
• Bird’s Eye View method: This method works well with dogs that have heavy muscling in the shoulders and short coats. Stand directly above your dog looking straight down over his body. If you touch one hand to each side of his ribs, how far apart are your hands?
• Doorway method: as shown in the video.
Lure your dog through a partially open door.
Have your dog squeeze through the doorway and stop when his shoulders are just past the doorjamb; measure the width of the door opening at the dog’s ribcage. Be sure the door and doorjamb touch the dog. This works well with a sliding door, and
a fistful of tasty treats. (The measuring video has a good demonstration of this method.)

Now it’s time to measure the person who will use the harness to determine the handle size. Measure the hand that will primarily be used on the harness (most dogs work on the person’s left side, with left hand on the handle). Please take each measurement 2-3 times for accuracy.
Use the harness worksheet on the following page to calculate your handle height.
This is best done with a helper who can assure you’re standing naturally and measure for you so you don’t have to bend over.
No Helper? No problem! Tape a piece of paper to a wall. Stand with your shoulder touching the wall. Use a pencil to mark the paper at your hand and wrist heights as described below. Then, measure the wall from the ground to the marks.
Ideally, the top of a rigid handle aligns with your wrist joint when your arm is relaxed at your side—this is similar to how a cane or walking stick is measured.
1) Stand while wearing normal shoes.
2) Be sure you are balanced and comfortable. Are you standing up straight? No slouching! Relax your shoulders. Steady yourself with a cane if you need.
3) Allow arm to hang naturally at your side. (Don’t bend or straighten your arm, just be relaxed.)
4) Measure from the bend in the wrist to the floor. Shoe check! Be sure to wear everyday shoes.
5) Repeat! Move around, shake out your arm. Stand up straight, relax the shoulders, and measure again.
Follow steps above for 1 & 2
3) Hold a pencil in your hand (or similar object to represent a handle) clutching it the way you wish to hold the harness handle.
4) Allow your arm to relax. Let your elbow relax naturally as you hold the pencil comfortably. (Don’t bend or straighten your arm.)
5) Measure from the pencil to the floor.
6) Repeat!
By default, we will use the wrist and/or hand measurements to calculate the handle heights. If hand/wrist are at or lower than the dog’s back, we suggest the minimum heights: a 2-4” rigid, or 3” leather handle.
You are welcome to specify specific handle heights! Please tell us if you’d like something else.
A leather Support Pull handle is the most popular choice to use while standing/walking with either the BAH or MSH.
If you want a secondary handle nice and short for pulling yourself up, or on stairs, just tell us. It could be a basic pull-strap, a clip-on grab handle, or a Support Pull handle.
Most clients that order an MSH with the rigid metal handle AND a Support Pull handle to use while standing/walking, we suggest the leather handle be made 1-2” lower than the metal handle. This allows the Support Pull handle to tuck underneath the handlebar and makes it easy to switch from pulling to bracing.
If you are ordering an MSH and will only use the rigid metal handle for bracing to rise from a chair or transfer to a chair (not when you’re standing/ walking), then we suggest a short 2-4” handle for the greatest stability. Consider the Support Pull as the handle to use while you’re on your feet. [THE END]
